Wednesday, February 29, 2012

Hop to it!

Wow.. where has the time gone? The last few weeks have been frantically busy and I can't believe it's the last day of February already! That means my (biggest) baby boy will be 7 on the weekend!! Lots to do, and as usual I've left it all to the last minute ;) Oh well... it'll be fine, right?

Anyway, getting on to the stamping stuff. If March goes by anywhere near as fast as February did, Easter will be here before we know it. So I've gotten a jump start (pun absolutely intended!) on my Easter crafting. I'm going to be holding a small workshop on March 18th, where we will be making some bag toppers for the long, think cello tubes. The plan is to fill them with some mini easter eggs and hide them in the garden for the kids to find :) (I know those of you who know me will be snorting with laughter at my mis-use of the word "garden")

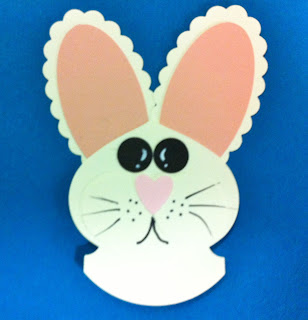
How cute will this little guy look perching on top of a tube of scrummy easter eggs?!?

I'll post a tutorial on how I made him after the workshop (with better photos, I promise!). Easy peasy punch art, great for making in bulk for all the family :)

If you'd like to book a spot at the workshop, just send me an email and I'll fit you in. It will be on Sunday, March 18th from 2 - 3.30pm. Cost will be $10 which will include materials to make 6 Bunnies (we will aim to complete one on the day and have the rest ready for assembly at home), afternoon tea and refreshments. If you are very, very lucky I won't have eaten all the chocolate before you get there :)

Sunday, February 19, 2012

One for the US

So a lady walks into a shop....sorry to get your hopes up, this is not a joke :) Apparently a lady came into the shop I work at and was looking for a baby card that said "Mom" instead of "Mum". Her friend was from America and she thought it might be nice to have a touch of home. The boss asked me to have a go at making a card to suit and this is what I came up with:

I kinda liked it... I think I may have to do a few more like this one :)

Tuesday, February 7, 2012

Rolled flower tutorial

I've had a few people ask me how I made the rolled flowers I use on some of my gift bags (most recently the favour box from my previous post), so I thought I'd throw together a quick photo tutorial. There are lots of other tutorials out there, some even using this new fangled video technology, but this is my crack at it :)

Step One:
Cut or punch a circle out of your desired cardstock. I used the 2 1/2" circle punch.


Step 2:
Draw a large, scallop flower type shape (I have used pen here so it is easy to see, you would ideally do this lightly in pencil), spiraling in towards the centre of the circle.  Leave a small circle in the centre - you will use this to attach the flower once rolled.


Step 3: Cut around your lines to create a spiral shape - remember to leave a small circle in the middle. Once you have your spiral you can sponge the edges to colour your flower and give it some depth (I haven't done this step in these photos)

Step 4:
Start to roll your spiral, from the outer edge of the circle to the middle. It may be helpful to use a toothpick or similar to get started. You want to roll it fairly tightly to start with. Once you reach the centre you can relax the flower and unroll until you get the look you desire.


Step 5:
Once you have rolled your spiral as tight (or loose) as you want it, you will need to secure it to the small circle you left in the middle. I find a hot glue gun works best, but you could use sticky strip, glue dots or even crystal effects - if you have the time to hold it in place until it dries :)
Once you've secured your flower you can embellish it with extra inking, a pearl or rhinestone in the centre, some glimmer mist, a brad.. anything you like!


So there you go... I hope it was easy enough to understand, and I hope you have fun making heaps of pretty, rolled flowers! Make sure you send me links to you photos if you do make some :)

Mini Valentines

One more quick post for today, just to show some very cute little Valentine cards. My craft & wine buddies (Hi Jo & Michelle!) came to have a play last week, and these little beauties were the end result.
They were mostly made by Michelle, but Jo and I claim credit for helpful tips, colour combos, embellishment placement, and two thirds of wine consumption ;)


The Paper Players #81 - Flowers!

As happens after every visit from Mr Postman - I've been on a creative bender! This project uses four of my new toys, and my latest obsession, Rolled Flowers!!


I used the Fancy Favour die to make a little gift bag for a friend (did the "my friend" stamp give it away?) and added the very subtle En Francais in the background, some gorgeous seam binding ribbon, and 3 cute little rolled roses. I thought using the flowers in a group really stands out and makes a point of the theme at The Paper Players this week - FLOWERS!! Why don't you head over and check out the other awesome creations :)

JAI #103 - Red & White!

When I think red, I usually think "RED", like Real Red or Cherry Cobbler. So for this week's Just Add Ink challenge, I thought I'd pick a shade of red I don't usually go to - Bravo Burgundy. It just so happened that my best friend (Hello Mr Postman!!) paid me a visit and I was able to use what I think will soon become one of my favourite stamps - En Francais! I keep telling myself that I don't "do" vintage stuff, but I seem to be really quite enjoying that style of stamp lately... maybe I have a fever ;)
So... a few hours, some chocolate and a couple of glasses of wine, and here is the result!


What I modestly think of as a very pretty little luminaire. I've teamed the Bravo Burgundy with Rose Red ink and card (for the bird), and some of my new Rose Red seam binding ribbon. The white vellum in the oval windows has been stamped with the En Francais background stamp in Rose Red, and my little birdie stamp had been white embossed. It was quite nice to turn off the lights once, I was finished, and enjoy the last of my wine with the soft flickering of my battery operated tea light candle :)

Wednesday, February 1, 2012

More birthday cards

Just a quick post today - no kids and a delish white hot chocolate waiting for me!

I got inspired by the new logo for a friend's shop (Wishes & Dreams, in Moonah - go check it out!) and I made this birthday card last night. The Forever Young set really isn't a "me" set, but for some reason I love it! I also used the current sketch challenge at The Friday Mashup to help with the layout - go have a look at the other cool entries!


I also made this one, which I CASed from Julie Davison's blog - I think she got the idea from her upline. I've used the little bird from the Best of Everything set a lot, but I haven't done much with the other stamps. These strawberries are too cute!