Tuesday, November 27, 2012

It's nearly Christmas!!!

I have no idea how a whole month has passed by... I'm sure I must have zombied my way through the odd day here and there! I could claim that this project took me most of that month to make, but 1) that would be a lie, and b) I would hope it would look a bit more blinged up if I had spent a month on it!

Most years we try to get the kids a Lego advent calendar instead of the chocolate type you get at the supermarket... I figure they are mental enough without having chocolate for breakfast! This year, though, since I have all these cool toys and my mad skillz, I thought I would try making one for the hubby and I - since chocolate for breakfast can only help us get through the day!

I found an awesome tutorial on Brenda Quintana's blog. It has videos, step-by-step photos and written instructions - hard to get it wrong! It's made just that little bit easier by using the Petal Card Punch for the box fronts. I strayed away from the traditional Christmas red & green to keep with my turquoise and silver/white decorating theme

So here it is... let me know what you think!


Monday, October 29, 2012

And just to continue the theme...

here's another card with an owl :) This one, however, is a PIRATE owl - so it's totally different!

It was for a birthday party, and as usual I left everything to the last minute. Since I was running short on time and inspiration for a pirate card for a 6 year old, I am not ashamed to say that I completely "borrowed" the layout from Tobe, over at Stampin' with Tobe. One day I'll come up with an original idea ;)


Now I'm off to finish preparing for my Christmas workshops....and I have a horrid feeling I forgot to order a particular colour of cardstock :/ Might be time for some last minute creative editing!

Saturday, October 27, 2012

An Owly card for Charlie Chuckles

You guessed it... I'm back with *another* owl! I think my little obsession may be getting out of control ;)  I love this set (Owl Occasions), and I love the little man I made it for - my honorary nephew, Charles!

I decided to use the new Framelits dies to attempt an interlocking gate card. Sounds fancy, but was actually pretty easy, and I'm really happy with how it turned out.

Here's the front - the island indigo frame opens to the left, then the central frame opens to the right.

And here's inside:


It's funny how much I'm using Summer Starfruit at the moment... when I first saw the new colours I really didn't go much on it. It really grows on you though :)

Anyway, we've got yet another party to go to tomorrow, so I need to get my mojo on and make a pirate card - stay tuned!


Wednesday, October 10, 2012

JAI#138 & Mojo#262

Another last minute dash to enter a challenge!!

I really did mean to get it finished earlier.. honest! But since my darling husband has abandoned me for the bright lights of San Francisco, I've had my hands full with the boys - and I mean FULL. Plus I've been doing a few small DIY jobs around the house which have had to be the priority in the child free minutes I can spare :) So after a quick and easy dinner, watching How To Train Your Dragon with the kids (resulting in a slightly traumatised 7 year old), and a *reasonably* speedy bed time routine, I managed to get a card done!

Here is my effort for the colour challenge of Summer Starfruit, Basic Grey & Whisper White at Just Add Ink and the sketch challenge Mojo Monday.


Hopefully I'll be back soon with dates and details for my Christmas worshop!

Wednesday, October 3, 2012

Mojo261 & PP115 Challenge

After a bit of a drought, it is now raining blog challenge entries here in mINKs land! I spent a blissful day crafting (with some awesome company!)  and managed to come up with a card to suit the Paper Players challenge #115 and the Mojo Monday Sketch Challenge #261


I used the ribbon, yellow & grey, and birthday combination from the Paper Players and chose basic grey with one of the 2012-2013 In Colours: Summer Starfruit. I must admit to now being overly attracted to it when the new colours first came out.... but it really grew on me after a while :)

Anyway, enough waffle... here is the card!


Tuesday, October 2, 2012

Ribbons!!!

Who wants FREE RIBBON?!?!

Answer: Everyone!!

Stampin' Up! have an awesome offer for October where you receive a free roll of the spiffy new In Colour stitched ribbon with every $60 purchase! Raspberry Ripple and Gumball Green are great Christmas colours, and a bit of ribbon is just the thing to spice up your cards this season.

If you would like to make a purchase, or host your own workshop to take advantage of this awesome offer, just let me know!

OR

You could stay tuned for details and sign up for my Christmas Stamp-a-stack! We will be making some very simple, but gorgeous Christmas cards and you can have a practice working with the new ribbons too!


JAI 137

Not only has it been a while between regular blog updates, it's also been a while between challenge entries! There have been a few I wanted to do, but time just got away from me and I didn't get the entries finished in time. But this week, I DID!!! 

Here is my take on the sketch challenge over at Just Add Ink - set by my lovely upline, Mae (*waves* Hi Mae! Yes, we must catch up soon... let me know when you're free :) )

Happy Hour is one of my favourite sets... the one I *had* to have as soon as I saw the new catalogue! Given my love of a good cocktail, and the name of my craft room being "The Margarita Lounge", is it any surprise? :) It's a really versatile set, with phrases to suit birthdays, Christmas and just because! I'm sure there will be a lot more posts with this set in the future :)


Thursday, September 27, 2012

Two by Two

Two by Two is one of the new single stamps on offer in the catalogue. It's so cute!!! It's perfect for baby and little kid's cards, and great for working on those colouring skills!


And speaking of colouring skills... I'm off to work on mine a bit more :)

Wednesday, September 26, 2012

Make A Cake!

I think this set will be one of my favourites from the new catalogue. It works for kids and adults, birthdays and weddings.. and it's just cute!
This is the first time I've had a chance to get it inked up since it arrived... so many new toys to play with, and so little time!!


I've got a few more cards in progress, with some more of the new catalogue pretties, so stay tuned!!


Oh, and one last thing: I can sew!!! Sort of :) I got a pretty new sewing machine last weekend and I tried it out by making a cushion for my craft room couch....with an owl, of course!! For someone who had trouble sewing in a straight line, I'm pretty happy with how it turned out :)


Sunday, September 9, 2012

A few little projects

Hello again crafty blog people!

I'm patiently waiting for my delivery of awesome toys from the new catalogue. Well, by patiently, I mean looking out the window thinking "is it here yet?!?". I think you all know what I mean.... waiting for a parcel you know us coming is torture! I've got a few bits and pieces from my preorder, but I can't wait for the rest of it to get here...I've got so many ideas I want to try!

In the mean time, here is a quick upload of a couple of cards I made a couple of weeks ago, just because I can!

And fingers crossed I'll be investing in a new computer soon... so I'll be able to do some updates properly :) Woot!

Tuesday, August 28, 2012

There is a Blogger app...who knew?!

The era of no updates has come to an end! Hurrah!! Since it's been pretty tricky to steal the husband's laptop lately, I have been attempting to browbeat my iPad into uploading photos...obviously that worked REALLY well. Anyway, fast forward a few months and someone mentions the brilliant idea that I should download the blogger app, cos it can do all that fancy stuff...like post blog entries and pics. So here I am... attempting to do just that! And for my first trick, I will show you all a sneak peek of some of the cool stuff from the new catalogue....THE NEW CATALOGUE people!!!! It's hitting the interwebs on September 1st :)


Oh, and in my absence, I've finished my craft room too!! Isn't it awesome :)

Thursday, May 24, 2012

Damn technology!

Once again, things are a little quiet in minks land. This is due to my computer deciding its time had come to go meet the great motherboard in the sky. I fear its untimely demise may have actually been the result of a lingering illness caused by one too many liquids finding their way onto the keyboard - i blame the kids!! I'm not that much of a tech head that I thought I'd have trouble without a computer, I mean there are other things to do, right? WRONG! I'm going insane! I have to check my email on the iPad, or my phone...I know! How can I possibly cope living under these conditions? Well, as has often been said to my oldest "suck it up, Princess". Hopefully mr tax man will be nice to us and I'll be able to get a new laptop soon... or should I say, my husband will get a new laptop and I'll inherit his old one (unless I'm banned after last nights teensy little accident where the twins may or may not have knocked my glass over his keyboard. But it was ok, we've learned our lesson and it had a plastic keyboard protector on it!). Aaaaanyway, I can't figure out how to get the bloody iPad to put the photos here, so once I've done my probation I'll steal the hubby's laptop and post some pics!

Monday, May 7, 2012

Absolutely nothing to do with stamping...

but I just had to show this little project I made for my husband to hang on the wall in his office.


For those of you who may not recognise it straight away, it's Roy & Moss from The IT Crowd (awesome show!), and Roy's opening line to almost every phone call he answers.
My John works in IT (doing something tricksy with computers that I don't understand) and has spent more than a few hours doing tech support for numpties like me in his career. And since he still has to do tech support for this particular numpty, I thought this little pressie might give him a chuckle :)

I found the pattern for it on a very cool blog called Dork Stitch, and even better, it was free! Now who doesn't love a free pattern? Huh? ;)

I'm planning on a couple of Harry Potter projects for my older boys next, and then I think I'll have to do this one, also from Dork Stitch! My oldest has this on a t-shirt, so I *have* to make it for him :)

So if I'm a little slack with posting my stamping creations, it's because I'm busily stitching away. But don't worry.. my craft phases never last for long, so I'll be back!

Wednesday, May 2, 2012

Paper Players #93 & Mojo Monday MOJO239

Can you believe I found some time to make cards this week! OMG! It's all thanks to my friend Jo (hi Jo!). I was planning to spend Tuesday catching up on some housework, but Jo caught me in the car park at school after I dropped the big boys off. Conversation went something like this:

J: What are you up to today?

L: Nothing much, just a bit of housework.

J: Oh, do you have to?

L: *snort* NO! What do you have in mind?

J: I feel like making cards.

L: Ok... let's go!


I've come to the conclusion that I'm really not very dedicated to my housewifely duties, and will abandon them with the slightest provocation :) Yay me!

Anyway.. we did manage to get a bit of card making done while our three little terrrors ran around harassing  each other (well, it was more like my two terrors harassing her's), and eating rice crackers.

Here's what I ended up with for the challenges I decided to enter (and it will be a birthday card for my Nan, so bonus!).


The Paper Players #93 had a tic tac toe challenge - to pic three squares from their challenge board and include those elements on your card. I chose square card, ribbon and designer paper. The DSP I used was the gorgeous Sale-A-Bration paper Everyday Enchantment (love it!) and I used the organza ribbon from SAB as well.

I combined these elements with the sketch challenge over at Mojo Monday - Round or Square.

I'm hoping to get some more work done on my craft room this weekend, but it's not looking promising.. unless this rain keeps up and saturday morning soccer is cancelled ;)


Sunday, April 22, 2012

My first award!!

So it seems that while I was absent from blog land, the lovely Kylie over at Scrappinstamp has decided my little blog was worthy enough to be included in her Liebster Blog Awards!


I think these sorts of awards are great... the Liebster Award is aimed at smaller blogs (less than 200 followers), and can really help a blog author to feel they are not alone in their own little crafty universe :) The idea is that if you receive a Liebster award from someone, it would be nice to share the love and pass one of your own awards onto 3 - 5 other blogs you love. And don't forget to link back to the blog you received your award from!

Here are some blogs that I enjoy reading and getting inspiration from:

Mae at Mae's Cachet

Kathy at Stamping Still   (sorry Kathy! I know Kylie linked you too, it must be nice to be so loved :))

Ally at Stamping and Crafting with Ally

Delys at Little Scraps of Paper

Helen at H2 Designs

Go check out their blogs and share some comments... we love to get comments!

Finally a new post!

For the hundreds of you who breathlessly check my blog every day, wishing and hoping for a new post.. TA-DA! Here's a new post!

Ok, I may be a teensy bit delusional thinking that there are hundreds of people awaiting my next post, but a girl can dream, can't she? Maybe one day... but for now, thanks to the 10 people who do read regularly (because I make them) for sticking with me during my recent silence. Things have been so crazy lately that I just haven't had the time or energy to do a lot of crafting. School, work, home and my twin cyclones of destruction have been dominating my life, and sucking my will to live (anyone get the Wayne's Word reference? Anyone?) Anyway, hopefully things will settle down a bit now and I'll be able to get a few more things made - clear out some room in my brain for new ideas!

So here is my latest creation:


I bought the Flower Fest stamp set a few months ago, and this is the first time I've taken it for a spin - and I'm really happy with the result. It does look better in real life (I feel the need to point out that I *didn't* take these pics...), and the white embossing really makes the flowers pop. I quite liked the idea of giving someone a bunch of flowers as a thank you card, it's kind of like "the flowers you give when you can't actually give flowers. I hope the recipient likes them... she made a lovely meal for the kids and I the last time the hubby was away for work and I thought that was an act of kindness deserving of a bunch of flowers :)


Saturday, March 31, 2012

pretty new stamps!

Just a quick one to show a thank you card that I'm quite proud of... my very first solo attempt at the baby wipe technique! My upline (Mae Collins) demonstrated this technique at her last class, and I was amazed at how easy it was.


I added a bit of pearl shimmer paint on the flowers, but it may be a bit tricky to see in the photo.
I haven't invested in too many of the ink refills, but I think I'll have to start getting some more. This technique is so easy, and I think it looks quite effective too!

Card: Crumb Cake, Baja Breeze, Very Vanilla, Soft Suede
Inks: Soft Suede, Crumb Cake, Baja Breeze
Stamps: Elements of Style, Teeny Tiny Sentiments, En Francais
Other: Antique brad, Chantilly Lace, Pearl, Pearl Alcohol Ink

Friday, March 30, 2012

Bye-bye Sale-A-Bration

*sniff* I am very sad to say goodbye to the lovely stamps and DSP from this year's Sale-A-Bration catalogue. I especially love the DSP, and I can see myself torn between using it on everything, and being really stingy with it so I don't run out!

Here is the last card I made using these awesome products:


On a completely different topic... OMG do I need to learn how to take better photos! I guess it would help not leaving them all until last thing at night... but with all my "helpful" children running around during daylight hours, getting any photos taken would most likely never happen!

My usual trick is to try a few pics, say "oh these look rubbish!" then ask my darling husband (and amateur photography enthusiast) to take them for me :) Unfortunately, he has yet to return from his latest jaunt to the US, so you poor unfortunates will have to make do with my efforts!

Easter treats!

It's only a week away... the visit from the fluffy white Easter Bunny!! Here are the cute little treats we made at my Easter workshop last weekend - I know, how very slack of me having taken nearly a week to post them!

These little toppers were pretty quick to make - and everyone at the workshop got to make 6 of them! A few M&Ms inside and they're ready for the kids to find on Easter Sunday. I can't take credit for inventing these myself, but there are so many floating around on the interwebs that I'm not sure who to credit the original idea to. I think I took some elements from a few different sites, and made up a few of my own because I didn't have the right punches :) But isn't that how it all works?

These little cuties I found on Jill Coleman's blog, and I thought they would be a really quick addition to the workshop. Great to put a few mini choc eggs in and have at the table for the big family lunch :)


I wish I'd remembered to take a photo of the cute little basket I made for the door prize... some more punch art, but a cute little chick hatching out of his egg this time! Oh well... maybe next year I'll remember!

An exciting footnote: my new craft space is almost ready!! Well, by "almost ready" I mean that it's been framed and the plaster has been put up, and the extra lights & outlets have been added. So all that's left really is painting, floor covering and moving all the stuff back in. It'll be done in a jiffy!*

*that's a Dalton jiffy (approximately 3 months), not the technical one the brainy people use (In astrophysics and quantum physics a jiffy is, as defined by Edward R. Harrison, the time it takes for light to travel one fermi, which is the size of a nucleon. One fermi is 10−15 m, so a jiffy is about 3 × 10−24 seconds.) Thanks Wikepedia!

Wednesday, March 14, 2012

It's almost time....

for a new Mini Catalogue!!

The sad news is that we say good bye to Sale-a-bration at the end of this month (have you got all the stamps yet??), but the good news is that as of April 1st, there will be a new mini to drool over!!

I've had a bit of a peek, and I have to say I'm impressed. A few excellent new tools are making an appearance, as well as some luscious new stamps and DSPs. Stampin' Up! have also added a new dimension to card making with SCENTED EMBOSSING POWDER!!! That's right.. now you cards can look awesome and smell delicious!

Here is a quick card I made with my new goodies tonight, inspired by Yapha Mason's card (sorry for the p.poor photography):


How many new goodies can you spot? Oh if only you could smell over the internet...it's delicious!

I've got a mad few days coming up - work, kids sports, renovations, dinner out with the girls, so I may not be able to get many cards made :( I've got soooo many ideas, just not enough time at the moment! Hopefully I'll be able to get one or two done and uploaded. Wish me luck!

Wednesday, February 29, 2012

Hop to it!

Wow.. where has the time gone? The last few weeks have been frantically busy and I can't believe it's the last day of February already! That means my (biggest) baby boy will be 7 on the weekend!! Lots to do, and as usual I've left it all to the last minute ;) Oh well... it'll be fine, right?

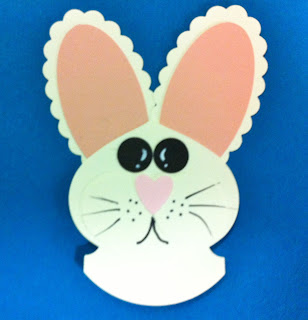
Anyway, getting on to the stamping stuff. If March goes by anywhere near as fast as February did, Easter will be here before we know it. So I've gotten a jump start (pun absolutely intended!) on my Easter crafting. I'm going to be holding a small workshop on March 18th, where we will be making some bag toppers for the long, think cello tubes. The plan is to fill them with some mini easter eggs and hide them in the garden for the kids to find :) (I know those of you who know me will be snorting with laughter at my mis-use of the word "garden")

How cute will this little guy look perching on top of a tube of scrummy easter eggs?!?

I'll post a tutorial on how I made him after the workshop (with better photos, I promise!). Easy peasy punch art, great for making in bulk for all the family :)

If you'd like to book a spot at the workshop, just send me an email and I'll fit you in. It will be on Sunday, March 18th from 2 - 3.30pm. Cost will be $10 which will include materials to make 6 Bunnies (we will aim to complete one on the day and have the rest ready for assembly at home), afternoon tea and refreshments. If you are very, very lucky I won't have eaten all the chocolate before you get there :)

Sunday, February 19, 2012

One for the US

So a lady walks into a shop....sorry to get your hopes up, this is not a joke :) Apparently a lady came into the shop I work at and was looking for a baby card that said "Mom" instead of "Mum". Her friend was from America and she thought it might be nice to have a touch of home. The boss asked me to have a go at making a card to suit and this is what I came up with:

I kinda liked it... I think I may have to do a few more like this one :)

Tuesday, February 7, 2012

Rolled flower tutorial

I've had a few people ask me how I made the rolled flowers I use on some of my gift bags (most recently the favour box from my previous post), so I thought I'd throw together a quick photo tutorial. There are lots of other tutorials out there, some even using this new fangled video technology, but this is my crack at it :)

Step One:
Cut or punch a circle out of your desired cardstock. I used the 2 1/2" circle punch.


Step 2:
Draw a large, scallop flower type shape (I have used pen here so it is easy to see, you would ideally do this lightly in pencil), spiraling in towards the centre of the circle.  Leave a small circle in the centre - you will use this to attach the flower once rolled.


Step 3: Cut around your lines to create a spiral shape - remember to leave a small circle in the middle. Once you have your spiral you can sponge the edges to colour your flower and give it some depth (I haven't done this step in these photos)

Step 4:
Start to roll your spiral, from the outer edge of the circle to the middle. It may be helpful to use a toothpick or similar to get started. You want to roll it fairly tightly to start with. Once you reach the centre you can relax the flower and unroll until you get the look you desire.


Step 5:
Once you have rolled your spiral as tight (or loose) as you want it, you will need to secure it to the small circle you left in the middle. I find a hot glue gun works best, but you could use sticky strip, glue dots or even crystal effects - if you have the time to hold it in place until it dries :)
Once you've secured your flower you can embellish it with extra inking, a pearl or rhinestone in the centre, some glimmer mist, a brad.. anything you like!


So there you go... I hope it was easy enough to understand, and I hope you have fun making heaps of pretty, rolled flowers! Make sure you send me links to you photos if you do make some :)

Mini Valentines

One more quick post for today, just to show some very cute little Valentine cards. My craft & wine buddies (Hi Jo & Michelle!) came to have a play last week, and these little beauties were the end result.
They were mostly made by Michelle, but Jo and I claim credit for helpful tips, colour combos, embellishment placement, and two thirds of wine consumption ;)


The Paper Players #81 - Flowers!

As happens after every visit from Mr Postman - I've been on a creative bender! This project uses four of my new toys, and my latest obsession, Rolled Flowers!!


I used the Fancy Favour die to make a little gift bag for a friend (did the "my friend" stamp give it away?) and added the very subtle En Francais in the background, some gorgeous seam binding ribbon, and 3 cute little rolled roses. I thought using the flowers in a group really stands out and makes a point of the theme at The Paper Players this week - FLOWERS!! Why don't you head over and check out the other awesome creations :)

JAI #103 - Red & White!

When I think red, I usually think "RED", like Real Red or Cherry Cobbler. So for this week's Just Add Ink challenge, I thought I'd pick a shade of red I don't usually go to - Bravo Burgundy. It just so happened that my best friend (Hello Mr Postman!!) paid me a visit and I was able to use what I think will soon become one of my favourite stamps - En Francais! I keep telling myself that I don't "do" vintage stuff, but I seem to be really quite enjoying that style of stamp lately... maybe I have a fever ;)
So... a few hours, some chocolate and a couple of glasses of wine, and here is the result!


What I modestly think of as a very pretty little luminaire. I've teamed the Bravo Burgundy with Rose Red ink and card (for the bird), and some of my new Rose Red seam binding ribbon. The white vellum in the oval windows has been stamped with the En Francais background stamp in Rose Red, and my little birdie stamp had been white embossed. It was quite nice to turn off the lights once, I was finished, and enjoy the last of my wine with the soft flickering of my battery operated tea light candle :)

Wednesday, February 1, 2012

More birthday cards

Just a quick post today - no kids and a delish white hot chocolate waiting for me!

I got inspired by the new logo for a friend's shop (Wishes & Dreams, in Moonah - go check it out!) and I made this birthday card last night. The Forever Young set really isn't a "me" set, but for some reason I love it! I also used the current sketch challenge at The Friday Mashup to help with the layout - go have a look at the other cool entries!


I also made this one, which I CASed from Julie Davison's blog - I think she got the idea from her upline. I've used the little bird from the Best of Everything set a lot, but I haven't done much with the other stamps. These strawberries are too cute!

Monday, January 30, 2012

JAI #102 - Kathy Tanner Tribute

Coincidence is a funny thing. I was looking around for some inspiration for boys birthday cards, and I was going back through the archives at Stamping Still (Kathy Tanner's blog). Not trying to give her a big head, or anything, but I love Kathy's style and I think her cards are just gorgeous. Hers is one of the first blogs I turn to for inspiration. I found this card, and thought it was a perfect CASE for my theme. Imagine my surprise, when later on I head over to Just Add Ink and see their theme for this week is CASing Kathy!  It's taken me a few days to get to, but tonight I finally did it! Here is my version of Kathy's gorgeous inlaid embossed card:
I think I may have to re-do the Elebration stamp - I'm not quite happy with my dodgy stamp placement (note to self - you bought the damn Stamp-a-majig, USE IT!!), or even dodgier watercolouring ;)


So that's it for me for this month! Head over to JAI and see what the other creative minds have done with Kathy's creations :)

Friday, January 27, 2012

How could I forget....


SALE-A-BRATION IS HERE!!!

A very exciting time in the SU calendar - you get awesome bonus items when you order!
Have a squizz at the  Sale-A-Bration brochure online

Spend $100 on SU products, and you get to choose one of the lovely new products released just for Sale-a-bration! Even more bonuses for being a hostess too... let me know when you'd like to have a workshop ;)

We're aliiive!

We survived! 2 tired, frazzled, overwhelmed adults and 4 loud, whiney, screaming, fighting, tantruming, gorgeous, adorable children all survived our latest family holiday intact! More or less. It was a challenge at times, but for the most part  I think everyone enjoyed themselves. If they could have, I'm sure the boys would have spent all day in the pool, except Wil... he doesn't seen to be quite as keen. I must say though, it was very nice to get back to our own bed! Hotel beds are never comfortable, and having Max's portacot in our room wasn't exactly helpful in getting a good night's sleep.

Now all we need to get through is the rest of school holidays!

Things have been so busy, with outings, playdates and general goofing off, that I haven't had much of a chance (or inclination!) to get the craft supplies out. The other night a couple of friends came over and we cracked open a bottle (or 4!) of bubbly and we went crazy! My bud Jo brought her Silhouette machine round, and we did a bit of creative mish-mashing, and we're pretty proud of the results!

Here they are:

A bit of cute, simple and combo goodness!

Silhouette onesies, and Michelle goes crazy with the pink and green!

Dinos rule! And my quilted masterpiece ;)

I'm so proud of this one, I thought it needed a close up! (Can you spot the pretty new Sale-a-bration DSP? Huh? Can you??)

 Loving the versatility of the Stocking punch, and am totally in love with my cute little dragon!

Working on my watercolour skilz  with the help of the cutest little elephant in the world! And no post would be complete with out some owls :)